Arquivo
Solucionando Problemas: Erro ao instalar o .Net Framework 3.5 no Windows Server 2012 ou Windows 8
Sintomas
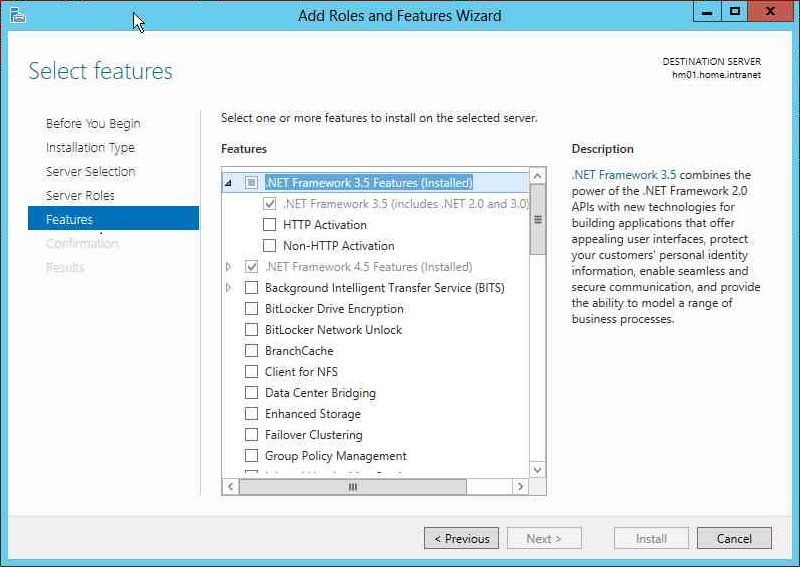
Ao tentar instalar no Windows Server 2012 .Net Framework 3.5 Feature a seguinte mensagem é exibida

Do you need to specify an alternative path? One or more instalation selections are missing source files on destination server. The server will try to get missing source files from Windows Update, or from a location that is specified by Group Policy. You can also click the "Specify an alternate source path" link on this page to provide a valid location for the source files.
Ao tentar prosseguir com a instalação o assistente falha informando que não foram encontrados os arquivos de origem da feature.

Instalation of one or more roles, role services, or features failed.
The source files could not be found. Try installing the roles, role services, or feature again in a new Add Roles and Features Wizard session, and on the Confirmation page of the wizard, click "Specify an alternate source path" to specify a valid location of the source files that are required for the instalation. The location must be accessible by the computer account of the destination server.
Causa
O erro ocorre porque os binários .Net Framework 3.5 não são copiados para o servidor durante a instalação do Windows. Durante a instalação da feature o assistente tenta conectar na internet utilizando a conta da maquina para autenticar no proxy, se não possuir uma regra para permitir a conexão da maquina a instalação da feature falha.
Solução
Para contornar o problema coloque a mídia de instalação do Windows Server 2012 ou do Windows 8 na maquina, e durante a instalação selecione o caminho <midia>:\sources\sxs ou utilize o PowerShell para instalar a feature com o cmdlet no Windows 2012
Add-WindowsFeature NET-Framework-Core -Source D:\sources\sxs

Para a instalação no Windows 8 execute o cmdlet
Dism /online /enable-feature /featurename:NetFx3 /All /Source:D:\sources\sxs /LimitAccess
Apos a execução do cmdlet verifique que a feature esta instalada no servidor
Este artigo foi originalmente escrito por:
Fernando Lugão Veltem
Inserindo a Chave e ativando o Windows via linha de comando
Como inserir a chave do seu Windows e ativar via linha de comando?
Siga os seguintes passos….
Abra um Prompt de comando com poderes administrativos e digite os seguinte Comandos
– Insira a Chave no campo indicado abaixo "Insira a Chave":
Digite no prompt de comando –> slmgr.vbs -ipk "Insira a Chave"
– Efetue a ativação do Windows:
Digite no prompt de comando –> slmgr.vbs /ato
– Obtenha informações do status atual do licenciamento:
Digite no prompt de comando –> slmgr.vbs /dlv
Pronto, seu Windows ja esta ativado via linha de comando . . . ![]()
Um grande abraço a todos e até a proxima…
Listar websites do IIS, incluindo host heard.
Boa tarde amigos nerds rsrsrsrsr . . .
Estou voltando aqui para publicar um Script Vbs para ajudar-nos em uma requisição que toda vez que seu chefe solicita, você quer chorar rsrsrsrs…
Este Script lista todos websites de um servidor IIS com as propriedades necessária para um inventário logico e sua estrutura física..
Então vamos lá…
Abra o notepad ou um editor de sua preferencia…
Copie script abaixo e salve o arquivo com IIS.VBS
Copie o arquivo para o servidor de IIS que você deseja efetuar o inventario dos sites publicados
Abra um prompt de comando e vá até onde você copiou o arquivo IIS.VBS
No prompt de comando digite IIS.VBS
Nesse momento ele listará na tela todos os websites que estão publicado no servidor com o webserver (IIS) configurado, porem se você quiser que o resultado seja enviado para um arquivo, digite no prompt de comando IIS.VBS >IIS.TXT
___________________________________________________________________________
OPTION EXPLICIT
DIM CRLF, TAB
DIM strServer
DIM objWebService
TAB = CHR( 9 )
CRLF = CHR( 13 ) & CHR( 10 )
IF WScript.Arguments.Length = 1 THEN
strServer = WScript.Arguments( 0 )
ELSE
strServer = "localhost"
END IF
WScript.Echo "Enumerating websites on " & strServer & CRLF
SET objWebService = GetObject( "IIS://" & strServer & "/W3SVC" )
EnumWebsites objWebService
SUB EnumWebsites( objWebService )
DIM objWebServer, objWeb, strBindings, strBaseInfo
WScript.Echo "SiteId" & TAB & _
"Comment" & TAB & _
"State" & TAB & _
"LogDir" & TAB & _
"RootDir" & TAB & _
"IP Address" & TAB & _
"Port" & TAB & _
"Host"
FOR EACH objWebServer IN objWebService
IF objWebserver.Class = "IIsWebServer" THEN
set objWeb = getObject(objWebServer.adsPath & "/Root")
strBaseInfo = _
objWebserver.Name & TAB & _
objWebServer.ServerComment & TAB & _
State2Desc( objWebserver.ServerState ) & TAB & _
objWebServer.LogFileDirectory & Tab & _
objWeb.Path & Tab
‘ Enumerate the HTTP bindings (ServerBindings) and
‘ SSL bindings (SecureBindings)
EnumBindings objWebServer.ServerBindings, strBaseInfo
EnumBindings objWebServer.SecureBindings, strBaseInfo
END IF
NEXT
END SUB
SUB EnumBindings( objBindingList, strBaseInfo )
DIM i, strIP, strPort, strHost
DIM reBinding, reMatch, reMatches
SET reBinding = NEW RegExp
reBinding.Pattern = "([^:]*):([^:]*):(.*)"
FOR i = LBOUND( objBindingList ) TO UBOUND( objBindingList )
‘ objBindingList( i ) is a string looking like IP:Port:Host
SET reMatches = reBinding.Execute( objBindingList( i ) )
FOR EACH reMatch IN reMatches
strIP = reMatch.SubMatches( 0 )
strPort = reMatch.SubMatches( 1 )
strHost = reMatch.SubMatches( 2 )
‘ Do some pretty processing
IF strIP = "" THEN strIP = "All Unassigned"
IF strHost = "" THEN strHost = "*"
IF LEN( strIP ) < 8 THEN strIP = strIP & TAB
WScript.Echo strBaseInfo & _
strIP & TAB & _
strPort & TAB & _
strHost
NEXT
NEXT
END SUB
FUNCTION State2Desc( nState )
SELECT CASE nState
CASE 1
State2Desc = "Starting"
CASE 2
State2Desc = "Started"
CASE 3
State2Desc = "Stopping"
CASE 4
State2Desc = "Stopped"
CASE 5
State2Desc = "Pausing"
CASE 6
State2Desc = "Paused"
CASE 7
State2Desc = "Continuing"
CASE ELSE
State2Desc = "Unknown"
END SELECT
END FUNCTION
____________________________________________________________________________
Pronto, você verá que o inventário do seu webserver estará 100% pronto, precisando no máximo você importar para uma planilha ou um doc para efetivar a documentação de forma mais apresentável.
Por enquanto é só…. Um grande abraço… E até mais…
IP address already in use error on a converted virtual machine
Bom dia caros leitores…
Estamos com a seguinte situação, estou migrando uma maquina com sistema operacional Microsoft (Guest ou Fisica) com o ultilitario Converter da Vmware. Apos a migração voce altera as propriedades da placa de rede e recebe uma mensagem “The IP address XXX.XXX.XXX.XXX you have entered for this network adapter is already assigned to another adapter”.
Para resolver esse problema siga os seguintes passos da base de conhecimento da Vmware.
Resolution
To resolve this issue:
- Remove the duplicate hardware.
For information on removing the duplicate hardware, see Networking Error, IP Address Already Assigned to Another Adapter (1179). If the steps in this article do not resolve this issue, or if there are no devices listed when you show hidden devices, proceed to Step 2. - Take a full backup of the registry. Do not skip this step.
- Click Start > Run, type regedit, and click OK.
-
Right-click My Computer and click Export to backup the registry.
-
Browse to HKEY_LOCAL_MACHINE\System\CurrentControlSet\Services\Tcpip\Parameters\Interfaces.
You see a list of GUIDs for each NIC that the system is aware of. -
To determine which GUIDs are currently active on your system, click Start > Programs > Accessories, then right-click Command Prompt and click Run As.
-
Enter the credentials for an administrative account.
-
In the command prompt, type:
net config srv -
Check this against the system that was converted. GUIDs that existed on the previous machine should not exist on the converted machine.
-
If the device is no longer a required part of the system, you can delete the entry.
Note: If an entry is deleted in error, restore the registry. -
When the entries have been cleared, you can assign a static IP.
Note: If the physical system is no longer available, check the HKEY_LOCAL_MACHINE\SOFTWARE\Microsoft\WindowsNT\CurrentVersion\NetworkCards\ registry key to determine the nomenclature and GUID of the affected network interface and compare it with the registry key in Step 5.
- Um grande abraço a todos…
Euclides P Silva
Instalando Service pack 1 no TMG 2010
Para instalação do service pack 1 do TMG 2010 siga os seguintes procedimentos.
-
If you downloaded the service pack from the Microsoft Download Center, do the following:
- Press the SHIFT key and right-click on the .MSP file, and then select Copy as path.
- Right-click the Command Prompt icon, and then select Run as administrator.
- Right-click the Command Prompt window and select Paste.
- Follow the instructions in the wizard.
Source: http://technet.microsoft.com/en-us/library/ff717843.aspx
Pessoal, desculpa o copy e past . . . é porque esta complicado o meu tempo, mas vale a intenção da documentação.
Bloqueando gravação Pendrive, USB, Cartao de memoria via Group Policy
Pessoal,
Atraves de Group Policy é possivel bloquear a gravação, leitura e a execução de pendrives ou dispositivos moveis ligados as estações ou notebooks em seu Active Diretory
No seu active directory abra o Group Policy Manager Editor;
Click em Computer Configuration –>
Administrative Templates: Policy Definitions (ADMX…) –>
System –>
Removable Storage Access –>
E ao lado direito escolha a opção que mais se adequada a sua necessidade, no nosso caso sera a opcao Removable Disk: Deny Write Access

Um abraco a todos….
Euclides Pereira da Silva
Duvidas? Post no blog que estarei respondendo assim que chegar.ok?
DEFAULT PERMISSIONS FOR SYSVOL
DEFAULT PERMISSIONS FOR SYSVOL
Em varias consultorias vejo alguns problemas que sao constantes, como por exemplo a perda ou alteração (voluntária ou não) das permissão do SYSVOL, abaixo explicamos como voltar as configurações default (ACLs).
%SystemRoot%\Windows\Sysvol\Sysvol
%SystemRoot%\Winnt\Sysvol\Sysvol\domain
%SystemRoot%\Winnt\Sysvol\Sysvol\domain\Policies
For each file or folder that is located in the %SystemRoot%\Winnt\Sysvol\Sysvol\domain\Policies
Sysvol share permissions :
Abraços a todos….
References : http://truetechsolutions.supersized.org/archives/8-Default-Permissions-for-Sysvol.html
By – Euclides Pereira da Silva
Criando USB Bootable do SBS 2011 Instalação padrão ISO
Vamos criando um drive USB de arranque para executar o instalador, ele é mais rápido do que um DVD, você pode encontrar um gravador de DVD e mídias de camada dupla para a instalação 6.5GB ISO para SBS Standard 2011. Microsoft fornece uma ferramenta que torna muito fácil (note que eu disse "fácil" não "rápido") .
Aqui está como fazê-lo:
Primeiro, você precisa do seguinte:
- A 64-bit Windows 7 sistema
- O Microsoft Windows 7 Download Tool USB / DVD instalado no sistema Windows 7 (http://images2.store.microsoft.com/prod/clustera/framework/w7udt/1.0/en-us/Windows7-USB-DVD-tool. exe )
- O SBS 2011 Instalação padrão ISO
Depois de ter aquelas em vigor, siga estas instruções simples:
- Abra o Windows 7 USB DVD Download Tool

- Clique em Procurar e localize o SBS 2011 Padrão de instalação do arquivo ISO.

- Clique em Avançar.
- Insira a mídia USB (se ele já não tenha sido inserido).
- Desativar seu verificação de vírus ao acessar no computador (isso pode interferir com as operações de cópia).
- Clique em Dispositivo USB.

- Selecione o correto USB de mídia (precisa de pelo menos 6.5GB de espaço não se esqueça) e clique em Iniciar cópia.

- Espere um momento muito, muito tempo ….

- Quando o processo for concluído, feche o Windows 7 USB / DVD Download Tool e ejetar a sua chave USB.

- Reativar o acesso on-digitalização do seu software anti-vírus.
Abraços,
Euclides Pereira da Silva
AD DS – Como recuperar a zona _msdcs–DNS
Como recuperar (Recriar) uma zona _msdcs, esse vídeo explica o passo a passo para isso.
Abraços
Euclides P S
